
PYNQ v2.7, Tutorial
Environment
PYNQ v2.7, Ultra92 v2, Xilinx 2020.2 tools
Tutorial
This post is almost same as this tutorial with a minor modification from Vitis HLS/Vivado 2020.2 version.
Vitis HLS
Use the simple vector addition code below, and run.tcl to export HLS-synthesized IP: vitis_hls run.tcl
void vadd(int in_arr_0[10], int in_arr_1[10], int out_arr[10]) {
#pragma HLS INTERFACE m_axi depth=10 port=in_arr_0 offset=slave bundle=INPUT
#pragma HLS INTERFACE m_axi depth=10 port=in_arr_1 offset=slave bundle=INPUT
#pragma HLS INTERFACE m_axi depth=10 port=out_arr offset=slave bundle=OUTPUT
#pragma HLS INTERFACE s_axilite register port=return bundle=CTRL

    for (int i = 0; i < 10; ++i) {
#pragma HLS pipeline
        out_arr[i] = in_arr_0[i] + in_arr_1[i];
    }
}
# Project name
set hls_prj out.prj

# Open/reset the project
open_project ${hls_prj} -reset

# Top function of the design is "top"
set_top vadd

# Add design and testbench files
add_files vadd.cpp
#add_files -tb test.cpp

open_solution "solution1"
# Use ultra96 v2
set_part {xczu3eg-sbva484-1-e}

# Target clock period is 10ns
create_clock -period 10

# Directives

############################################

# Simulate the C++ design
#csim_design -O
# Synthesize the design
csynth_design
# Co-simulate the design
#cosim_design
# Implement the design
export_design -format ip_catalog

exit
Vivado
vivado &to run Vivado and create RTL Project without specifying any source files. Selectxczu3eg-sbva484-1-eas the part.- Select Create Block Design. On the Diagram window, right click and select Add IP→Zynq UltraScale+ MPSoC.
- Right click and select IP Settings. Under IP, select Repository. Add the HLS project we just created. In our
run.tcl, it’sout.prj. Select OK to add Vadd IP. - Right click and select Add IP→Vadd. I changed the name of the IP block as vadd.
- Add IP→AXI SmartConnect. Add two AXI SmartConnect IPs and change the number of slave interfaces to 1 for both.
- Double click Zynq IP and in PS-PL Configuration tab, add AXI HP0 FPD and AXI HP1 FPD.
- Connect m_axi_INPUT_r and one SmartConnect’s AXI slave. Connect SmartConnect’s AXI master and one of AXI slaves of Zynq. Do the same for m_axi_OUTPUT_r with another SmartConnect.
- Select Run Block Automation and Run Connection Automation to complete the block diagram. One difference from this tutorial is that there are two AXI slaves in vadd IP: s_axi_CTRL and s_axi_control.
- Right click design_1 and select Create HDL wrapper. Select Generate Bitstream.

Block Diagram, s_axi_control needs to be properly connected
Pynq
Rename design_1.hwh to design_1_wrapper.hwh. Open Jupyter notebook, and upload design_1_wrapper.bit and design_1_wrapper.hwh. Run the code below to validate the result.
from pynq import allocate
from pynq import Overlay
import numpy as np

overlay = Overlay("design_1_wrapper.bit")
# overlay?
vadd = overlay.vadd

#for i in overlay.ip_dict:
#    print(i)

in_arr_0 = allocate(shape=(10,),dtype=np.int32)
in_arr_1 = allocate(shape=(10,),dtype=np.int32)
out_arr = allocate(shape=(10,),dtype=np.int32)

vadd.s_axi_control.register_map.in_arr_0_1 = in_arr_0.device_address
vadd.s_axi_control.register_map.in_arr_1_1 = in_arr_1.device_address
vadd.s_axi_control.register_map.out_arr_1 = out_arr.device_address

np_in_0 = np.array([-3,-1,1,3,5,7,9,11,13,15],dtype=np.int32)
np_in_1 = np.array([1,2,3,4,5,6,7,8,9,10],dtype=np.int32)
np_out = np.zeros((10,), dtype=np.int32)

np.copyto(in_arr_0, np_in_0)
np.copyto(in_arr_1, np_in_1)

idle = 0
vadd.s_axi_CTRL.register_map.CTRL.AP_START = 1

# wait for the kernel to finish
while idle == 0:
    idle = vadd.s_axi_CTRL.register_map.CTRL.AP_IDLE

np.copyto(np_out, out_arr)
correct_res = np_in_0 + np_in_1
print(np.array_equal(np_out, correct_res))
Take a look at previous post to run on terminal.
FracBNN
NOTE: In Vivado, File→Project→Write tcl and check Write all properties, Copy sources to new project, Recreate Block Designs usin Tcl to recreate the project.
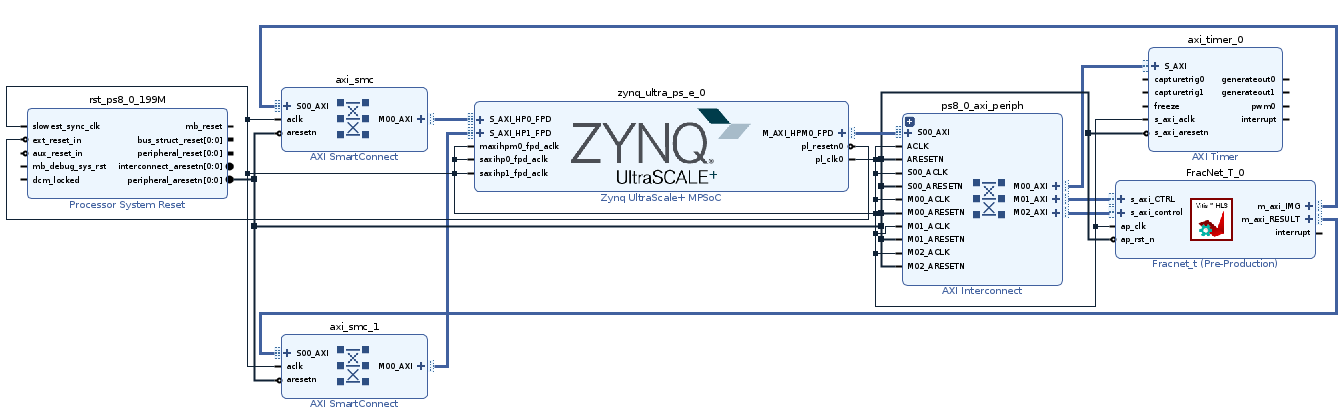
FracBNN Vivado 2020.2 Block Diagram, you may need to generate something like this for different Vivado ver.
Verified FracBNN with PYNQ v2.7 and Vitis 2020.2 is in this repo. Modifications from the previous version include HLS ALLOCATION syntax in .cpp file and s_axi_control in Vivado’s block diagram.